|
Leopard Gecko Breeding Advice
Breeding Leopards is relatively easy.
They just do it no matter what, actually.
You just need to know how to make sure your female
stays healthy,
how to prepare a nesting site and how to incubate
the eggs.
The Geckos:
You obviously need at least one male and one female to start breeding
Leopard Geckos. You can also keep one male with a few females depending
on cage size. I keep a variety of setups. My best one (I think) is a 33
gallon "breeder" tank that has floor space of 36"x18". It contains one
male and three females. There are branches to climb on and logs to hide
in which gives them more space to walk on. I don't think that it is overcrowded.
How to tell if your geckos are male or female? Try my "Male
or Female?" page for a brief description and a photo.
General & Gecko Pre-season Conditioning:
You need to make sure the female has enough calcium all through breeding
season (Feb.-Aug) and that she stays well-fed. You can leave the calcium
out in a low dish (I use small plastic bottle lids like the ones that come
on Rep-Cal or Herptivite cans) and she will take it freely when she needs
it. I actually leave the calcium in the cage like that year round. The
males will sometime lick at it if they need it too. You don't want them
to eat the sand to try and get calcium. Also dust the crickets every other
feeding during breeding season. (Don't use a calcium supplement with D3
added as too much D3 can be toxic.) Leopard Geckos get plenty of D3 from
the crickets and mealworms they eat. Start this conditioning in early Feb.
to ensure healthy parents and offspring.
 Cage
Preparation: Cage
Preparation:
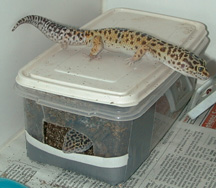
First of all you will need to put in a laying box for her and leave
it in there all the time. I use old tupperware or similar with the lid
on. Cut a hole in the side big enough for her to get in to. Fill the box
about halfway with moist (not soaking) vermiculite or perlite (from a plant
nursery). She will go in there when she is ready and start digging. (All
of the geckos will enjoy the moist box as it aids in shedding too.) That
container on the right is about 4.5 inches wide by 8 inches long by 4 inches
high. This is a nice sized laying box for 1-3 females. Check it often during
breeding season. The clear sides help as you can lift the box up and look
thru the bottom to see where the eggs are located much of the time.
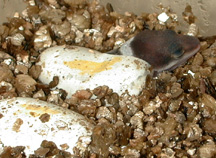
 Laying: Laying:
You will know when she gets eggy because you can see the 2 eggs in
her right through her skin. Trust me, you will know. She will most likely
lay eggs about once every 2-4 weeks so you can see why she needs a lot
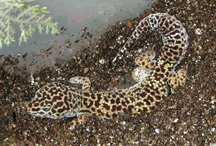
of calcium. She may start to refuse food when she is about to lay. Most
likely there will be vermiculite spewed out of the tupperware as she begins
to dig also. She will dig quite a hole in the vermiculite as you can see
in the picture to the left. You will also notice when she has laid her
eggs because she will be a lot skinnier. Then you just remove the eggs
and incubate them.
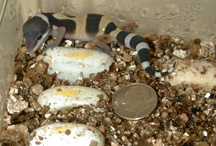
IMPORTANT: Do not turn the eggs over. Transport
the eggs in the same position they were laid to the incubator.
Your gecko will be ravenous now so be sure to feed her to keep her weight
up before she refuses food the next time. (Definitely dust the crickets
for feeding after laying. She needs to get her calcium levels back up.
A healthy well-fed gecko will have no problem laying eggs all season. But
you have to keep an eye on her to make sure her tail stays nice and fat.
If your gecko appears particularly weak after egg laying you will want
to remove her from the male for a time until she gets her strength back
Incubation:
I use an old cage called a Neodesha cage. I cover the little screen
at the top with foil to keep the temperature and humidity constant inside.
I put a thin mylar heating pad under it and attach a thermostat to keep
a constant temp. (There are thermostats available from a number of places
including your local pet store or a wider variety is available from places
like Big Apple Herp in NY.) In
the cage, I put another larger tupperware box or plastic shoe box filled
almost all the way with moist vermiculite (moist not soggy). I put the
top on it but the top has small holes in it. This is the hard part. Try
to get it to stay very humid but not too wet so as to get moldy. You have
to experiment with this. The remote temp detector thing from the thermostat
gets placed not only in the cage but into the vermiculite in the shoe box.
There should be some condensation inside the shoebox but it should not
be dripping. Water will have to be added periodically to keep it moist.
This is a judgement call and depends on your set-up.
 Temperature
- Dependent Sex: Temperature
- Dependent Sex:
I set the thermostat to keep a constant temp of 81 degrees. This ensures
that I get all females and can keep them together later if they don't sell.
If you want males you can keep them at 87-88 degrees to be sure. 85 is
supposed to get about half male and half female but then you can also get
hot female and cool males that don't breed well or at all. You just put
the eggs in there buried about halfway and incubate away for about 6-8
weeks and instant geckos!
Rearing the Hatchlings:
 They
don't eat for about a week or until the first shed. I usually let them
tool around in the They
don't eat for about a week or until the first shed. I usually let them
tool around in the  incubator
on the vermiculite for about 2 days before I remove them to individual
plastic shoe boxes with paper towels for substrate. They hatch with a yolk
sack attached much of the time and I have seen them scrape it off on the
paper towels. That is why I leave them in the vermiculite for a couple
of days. incubator
on the vermiculite for about 2 days before I remove them to individual
plastic shoe boxes with paper towels for substrate. They hatch with a yolk
sack attached much of the time and I have seen them scrape it off on the
paper towels. That is why I leave them in the vermiculite for a couple
of days.
I keep the hatchlings separately in plastic shoeboxes in a rack that
was made for specially for them. It has heat tape all through it so that
the backs of the shoeboxes can have nice gentle heat. You can keep them
together but you need to watch carefully that everyone is eating and no
one is getting picked on. Keeping them singularly for the first couple
of months ensures that there will be no tail losses from nippy cagemates
also.
Breeding Links:
 Melissa
Kaplan's LG & African Fat-Tail - Breeding & Egging Page Melissa
Kaplan's LG & African Fat-Tail - Breeding & Egging Page
Home
Search
|